Snow fencing can eliminate the need for snow removal, lower pavement maintenance costs, and increase visibility and safety on the road. A well planned snow fencing program can save time and money. Following are installation instructions for snow fence.
Snow fencing reduces the wind speed, causing most blowing snow to fall behind the barrier. When the snow is at rest, the particles freeze together making a smooth snow drift.
Snow fencing is designed for snow storage. A thorough knowledge of the problem is needed to estimate a sound solution.
Design is critical to installing the most effective snow fencing for the area.
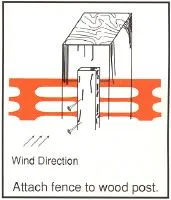
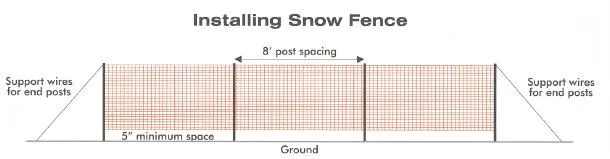
Correct placement is essential in installing effective snow fencing. Incorrect placement can make the snow drift problem worse. Fence posts should be spaced no more than 8 feet apart for 4 ft. snow fences. End posts should be 6 ft. or less from the adjacent post.
To ensure that the fence performs at its highest level, continual maintenance checks are essential. Check the anchoring system and look for missing and damaged parts periodically.
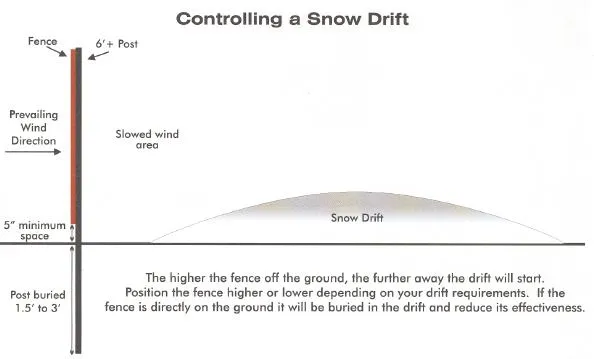
Snow fence is designed to CREATE drifts rather than to prevent them. Snow drifts form wherever the wind slows down, so the basics of drift control are (1) keep a blizzard wind moving, or (2) slow it down where you want the snowdrift. Snow fences act as windbreaks, causing blowing snow to be deposited as drifts where it is stored.
 Safety Netting
  Barrier Netting
  Loading Dock Safety Nets
  Facility & Warehouse Safety
  Construction Safety Catalog
  Debris Netting Panels
  Fall Safety Netting
  Steel Netting
  Kevlar Reinforced Netting
  Conveyor Netting
  Drone Safety Netting
  Spectator Safety Products
  Transportation Safety Netting
  Plastic Fence
  Cargo Nets
  1" Webbing Cargo Net
  2" Webbing Cargo Net
  Custom Cargo Netting
  Cargo Netting Roll
  Military Grade Cargo Lifting Net
  Decorative Rope Cargo Net
  Truck Cargo Net
  Truck Cargo Net Kit
  Rope Cargo Net
  Steel Cargo Net
  Kevlar Reinforced Cargo Net
  Jumbo Lifting Nets
  Warehouse Cart Netting
  Pallet Rack Netting
  Debris Net Rolls
  Loading Dock Solutions
  Wall Mounted Loading Dock Nets
  Above-Ground Loading Dock Safety Nets
  In Ground Loading Dock Nets
  Existing Bollard Safety Nets™
  Construction Netting and Mesh
  Debris Netting Panels
  Fall Safety Netting
  Debris Netting Rolls
  Hatch Safety Netting
  Safety Barrier Netting
  Warehouse Safety Netting
  Hatch Netting
  Rack Safety Netting
  Loading Dock Solutions
  Military Netting
  Plastic Netting
  All Purpose Nets
  Barrier Netting
  Custom Barrier Netting
  EZ Barrier
  Knotless & Knotted Barrier Netting
  Sports Barrier Netting
  Warehouse & Dock Safety Barriers
  Pallet Rack Barrier Netting
  Sports Netting
  Custom Sports Netting
  Golf Netting, Barriers & Cages
  Baseball Netting & Cages
  Spectator Safety Products
  Camouflage Nets
  Drone Netting
  Gym Divider Curtains
  Lacrosse Backstops
  Agricultural & Pest Control Netting
  Shade Cloth
  Trellis Netting
  Crop Protection & Blueberry Netting
  Bird Netting
  Pond Netting
  Pest Control
  Poultry Netting
  Shade Cloth
  Square / Rectangular Shade Cloth
  Triangular Shade Cloth
  Metal Netting
  Steel Cable Netting
  Conveyor Netting
  Light Duty Conveyor Netting
  Heavy Duty Conveyor Netting
  Heavy Duty Conveyor Netting w/ Debris Liner
  Plastic Fence Netting
  Multi-Use Plastic Fence
  Safety Barrier Fence
  Containment Netting
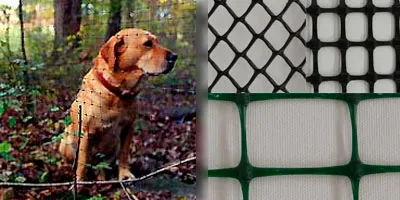
  Deer Fence
  Plastic Elk Fence
  Plastic Agricultural Netting
  Plastic Pallet Rack Netting
  Plastic Bird Netting
  Plastic Poultry Netting
  Plastic Snow Fence